DIY earthworm bin offers a rewarding way to reduce your food waste and create nutrient-rich compost. Building your own bin allows you to customize the design and size to fit your needs, saving money compared to purchasing a pre-made option. This guide will walk you through the process of designing, building, and maintaining your own earthworm bin, empowering you to transform your kitchen scraps into valuable compost.
From choosing the right materials and creating a suitable environment to introducing the worms and managing their feeding, we’ll cover all the essential steps. You’ll learn about different bin configurations, tips for ensuring proper ventilation and moisture levels, and how to harvest the valuable worm castings. Whether you’re a seasoned gardener or a composting novice, this comprehensive guide will equip you with the knowledge and skills to embark on your own worm composting journey.
Designing Your Earthworm Bin

Designing your own earthworm bin is a fun and rewarding project, and it’s surprisingly easy to do. You can tailor it to your needs and resources, and it’s a great way to recycle food scraps and create valuable compost.
Choosing the Right Size
The size of your earthworm bin will depend on how much food waste you produce and how much compost you need. A good rule of thumb is to start with a bin that can hold about 1 cubic foot of material. This will be enough for a small family to start composting their food scraps. If you have a larger family or a lot of food waste, you may want to consider a larger bin.
Choosing the Right Materials
You can use a variety of materials to build your earthworm bin. Here are a few popular options:
- Plastic storage bins: These are a great option because they are inexpensive, readily available, and easy to clean. However, they can be prone to cracking or breaking if they are not handled carefully.
- Wooden boxes: Wooden boxes are a durable option, but they can be more expensive than plastic storage bins. They may also need to be treated with a sealant to prevent rot.
- Metal containers: Metal containers are a good choice for durability and longevity, but they can be more expensive than other options.
Different Bin Configurations
There are a few different ways to configure your earthworm bin. Here are a few examples:
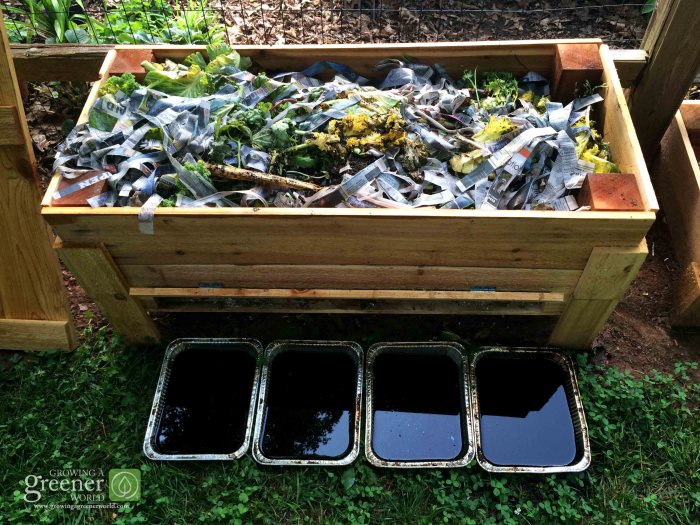
- Single-chamber bin: This is the simplest type of bin, with a single chamber for the worms and their bedding. It’s a good option for beginners.
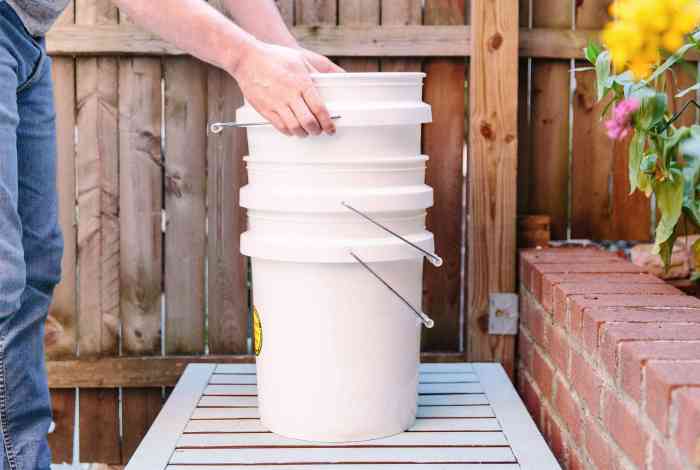
- Multi-chamber bin: This type of bin has multiple chambers, which allows you to separate the worms and their bedding from the finished compost. It’s a good option if you want to be able to harvest compost more frequently.
- Vertical bin: This type of bin is stacked vertically, which can save space. It’s a good option for people who have limited space.
- Horizontal bin: This type of bin is laid out horizontally, which can make it easier to access the worms and their bedding. It’s a good option for people who want to be able to easily monitor the worms.
Bin Design Considerations
When designing your earthworm bin, consider these factors:
- Drainage: The bin should have drainage holes to allow excess water to escape. This will help to prevent the bedding from becoming too soggy, which can harm the worms.
- Ventilation: The bin should be well-ventilated to allow air to circulate. This will help to prevent mold and mildew from growing.
- Accessibility: The bin should be easy to access for adding food scraps, removing finished compost, and checking on the worms.
- Durability: The bin should be made from durable materials that can withstand the weight of the bedding and the worms.
Earthworm Bin Design Table
| Bin Design | Dimensions | Materials | Pros | Cons |
|---|---|---|---|---|
| Single-chamber, horizontal | 2′ x 2′ x 1′ | Plastic storage bin | Inexpensive, easy to build | Limited capacity, can be difficult to access |
| Multi-chamber, vertical | 3′ x 1′ x 1′ | Wooden box | Durable, can be easily stacked | More expensive, can be heavy |
| Single-chamber, vertical | 2′ x 2′ x 2′ | Metal container | Durable, can be easily cleaned | Expensive, can be heavy |
Choosing the Right Materials

The materials you choose for your worm bin will directly affect its longevity, functionality, and the overall success of your worm composting endeavor. You’ll want to select materials that are sturdy, non-toxic, and conducive to a healthy worm environment.
Choosing Non-Toxic Materials
It’s crucial to prioritize materials that are safe for both your worms and the environment. Worms are sensitive creatures, and exposure to toxins can harm them or contaminate your compost.
- Avoid using treated lumber, as it often contains preservatives that can leach into the compost and harm your worms.
- Opt for untreated wood, such as cedar, redwood, or pine, which are naturally resistant to rot and decay.
- Plastic containers are also a popular choice for worm bins, as they are readily available, inexpensive, and easy to clean. However, ensure that the plastic is food-grade and free of BPA or other harmful chemicals.
- Recycled containers, such as plastic tubs or storage bins, can be excellent for worm bin construction. Before using them, make sure they are thoroughly cleaned and free of any residue that could be harmful to worms.
Repurposing Everyday Items
With a little creativity, you can easily repurpose everyday items into your worm bin. This not only saves you money but also reduces waste.
- Old wooden pallets can be disassembled and used to create the frame of your worm bin.
- Plastic storage totes, often found at garage sales or thrift stores, are ideal for creating a worm bin.
- Large plastic garbage cans can be modified to create a spacious and durable worm bin.
- Used tires, cleaned and sanitized, can also be repurposed into a unique and functional worm bin.
Setting Up Your Worm Bin
Now that you have your worm bin ready, it’s time to prepare it for its new inhabitants. This involves creating a suitable environment for your worms to thrive, including a comfortable bedding material and a balanced ecosystem.
Preparing the Worm Bin
Before introducing your worms, it’s essential to set up your bin properly. Follow these steps to ensure a comfortable and healthy environment for your worm colony:
- Clean and Disinfect: Thoroughly clean your worm bin using a mild soap solution and water. Rinse it well to remove any soap residue. If you’re using a recycled container, disinfect it with a bleach solution (1 part bleach to 10 parts water) and let it air dry completely. This step eliminates any harmful bacteria or contaminants that could harm your worms.
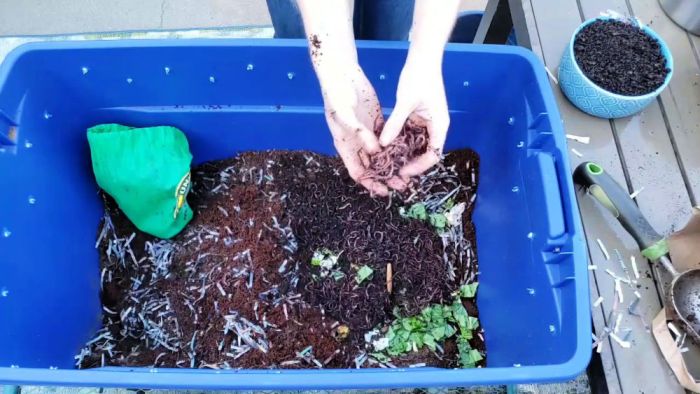
- Add Bedding: Choose a suitable bedding material that provides moisture, aeration, and a food source for your worms. Shredded newspaper, coconut coir, and compost are popular options. You can also mix different bedding materials for optimal results.
- Moisten the Bedding: Once you’ve added the bedding, dampen it with water until it feels like a wrung-out sponge. The ideal moisture level is crucial for worm health and activity. You can adjust the moisture level by adding or removing water as needed.
- Create Layers: Depending on your bin size, you can create layers of bedding. For example, you can start with a layer of shredded newspaper, followed by a layer of compost, and then another layer of shredded newspaper. This provides different environments for your worms to explore and ensures a balanced food source.
- Add Food Scraps: You can add a small amount of food scraps to the bedding. This helps the worms establish their food source and provides them with a balanced diet. Start with small amounts and gradually increase as the worm population grows.
Bedding Material
The bedding material is crucial for your worms’ well-being. It provides a comfortable home, a source of food, and helps maintain the right moisture levels.
- Shredded Newspaper: A readily available and inexpensive option. Ensure the ink is non-toxic and free from glossy coatings. Soak the newspaper in water for a few hours to soften it before shredding. This process removes excess ink and creates a suitable bedding material.
- Coconut Coir: A natural fiber derived from coconut husks. It’s a good choice as it’s absorbent, retains moisture well, and provides a suitable environment for worm activity. You can find coconut coir in various forms, including bricks, chips, or fiber.
- Compost: Already-decomposed organic matter that provides essential nutrients for worms. You can use finished compost or add a layer of compost to your worm bin. It’s a great source of food and helps create a balanced ecosystem.
Creating a Balanced Environment
Maintaining a balanced environment is essential for a healthy worm colony. Here are some key factors to consider:
- Moisture: The ideal moisture level is similar to a wrung-out sponge. Too much moisture can lead to anaerobic conditions, while too little moisture can dehydrate the worms. You can adjust the moisture level by adding or removing water as needed.
- Temperature: Earthworms thrive in temperatures between 55°F and 75°F (13°C and 24°C). Avoid extreme temperatures, as they can stress or even kill your worms.
- Aeration: Worms need oxygen to breathe. Ensure adequate aeration in your worm bin by providing spaces for air circulation. You can achieve this by using a bin with drainage holes, adding layers of bedding with different textures, or turning the bedding regularly.
- pH: The ideal pH range for earthworms is between 6.5 and 7.5. You can test the pH of your bedding using a pH meter or test strips. You can adjust the pH by adding lime or vinegar, if necessary.
Feeding Your Worms: Diy Earthworm Bin
Earthworms are voracious eaters, and their diet consists primarily of organic matter. Providing your worms with a steady supply of food is crucial for their health and the efficient operation of your worm bin. The right food choices will ensure a thriving worm population and a steady production of nutrient-rich castings.
Suitable Food Scraps
Earthworms are surprisingly adaptable when it comes to their diet. They can break down a wide variety of organic materials, making them ideal for composting food scraps. Here’s a list of suitable food scraps:
| Food Category | Suitable Food Scraps |
|---|---|
| Fruits and Vegetables | Apple cores, banana peels, carrot tops, lettuce leaves, melon rinds, potato peels, spinach leaves, tomato cores, and watermelon rinds |
| Grains and Cereals | Bread crusts, cooked pasta, rice, and oatmeal |
| Dairy Products | Eggshells (crushed), yogurt, and cheese (in moderation) |
| Other | Coffee grounds, tea bags, shredded paper, and cardboard (in moderation) |
Food Preparation and Overfeeding
Preparing food scraps before adding them to your worm bin is essential. It helps prevent odors and ensures the worms can easily digest the food. Here’s how to prepare food scraps:
- Chop or shred large pieces of food into smaller, manageable sizes. This allows for faster decomposition and reduces the risk of food clumping.
- Avoid adding oily or fatty foods, such as meat, fish, bones, and dairy products in large quantities. These can attract pests and create unpleasant odors.
- Avoid adding acidic foods, such as citrus peels, in large quantities. These can alter the pH of the bin, potentially harming the worms.
- Avoid adding processed foods, such as chips, candy, and cookies. These can be difficult for worms to digest and may attract pests.
Overfeeding can lead to several problems, including:
- Odor: Excess food decomposes slowly, generating unpleasant odors.
- Mold: Excess food can lead to mold growth, which can be harmful to worms.
- Reduced Worm Activity: Worms may avoid areas with excess food, leading to uneven decomposition.
Managing Food Scraps and Preventing Odors
Managing food scraps effectively is crucial for maintaining a healthy worm bin and preventing odors. Here are some tips:
- Start Small: Begin by adding small amounts of food and gradually increase the amount as your worm population grows.
- Layer Food Scraps: Instead of adding all the food scraps at once, layer them with bedding material, such as shredded paper or coconut coir. This helps prevent food from clumping and ensures even decomposition.
- Monitor the Food: Check the bin regularly to ensure food is decomposing properly. If food is not decomposing quickly enough, reduce the amount you add.
- Use a Worm Tea: Worm tea is a nutrient-rich liquid that can be collected from the bottom of the worm bin. It can be used to water plants, providing them with essential nutrients.
- Clean the Bin Regularly: Remove any excess food scraps or bedding material that is not decomposing. This helps prevent odor and mold growth.
“The key to successful worm composting is to maintain a balance between food input and worm activity. By providing a suitable diet and managing food scraps effectively, you can ensure a healthy worm population and a steady supply of nutrient-rich castings.”
Expanding Your Worm Composting

Worm composting is a great way to reduce your food waste and create nutrient-rich compost for your garden. As you become more experienced, you may find yourself wanting to compost more food waste. There are a few ways to expand your worm composting operation.
Adding Additional Bins
Adding more worm bins is the simplest way to increase your composting capacity. This is especially useful if you have a large amount of food waste to compost. You can buy additional bins or build them yourself. When adding additional bins, it’s important to consider the space you have available and the amount of food waste you produce. You’ll also need to ensure you have enough worms to populate the new bins.
Expanding Existing Bins
If you have limited space, you can expand your existing worm bin by adding more layers or compartments. You can also use vertical worm composting systems, which are designed to maximize space. When expanding an existing bin, make sure to provide adequate ventilation and drainage. You may also need to adjust the feeding schedule to accommodate the increased worm population.
Scaling Up for Larger Quantities, Diy earthworm bin
For large-scale worm composting, you can use specialized systems designed for high-volume food waste. These systems typically involve multiple bins or layers, with automated feeding and drainage systems. They can be expensive to set up but can handle large amounts of food waste.
Advanced Worm Composting Techniques
There are a number of advanced worm composting techniques that can improve efficiency and reduce odor. These include:
- Vermicomposting with Bedding Materials: Different bedding materials like shredded newspaper, coconut coir, or compost can be used to create a favorable environment for worms. These materials help retain moisture, provide aeration, and improve the overall health of the worm bin.
- Vermicomposting with Worms: Different worm species are suited for different climates and food waste types. Researching and selecting the best worm species for your environment can improve composting efficiency.
- Vermicomposting with Worm Castings: Worm castings are the excrement of worms and are a highly valuable fertilizer. Understanding how to harvest and utilize worm castings effectively can maximize the benefits of worm composting.
“By utilizing advanced worm composting techniques, you can create a more efficient and sustainable system that reduces food waste and produces high-quality compost.”
Creating a DIY earthworm bin is a fun and rewarding project that benefits both your garden and the environment. By following the steps Artikeld in this guide, you can transform your kitchen scraps into valuable compost while reducing your environmental footprint. With a little patience and effort, you’ll soon be enjoying the benefits of worm composting and witnessing the transformation of food waste into a valuable resource for your garden.
Creating a DIY earthworm bin is a great way to recycle kitchen scraps and create nutrient-rich compost for your garden. The process is surprisingly simple, and you can find detailed instructions online, just like you can find information about medications like acyclovir 800mg. Once your earthworm bin is established, you’ll be amazed at how quickly it breaks down organic waste, making it a valuable addition to any sustainable lifestyle.
